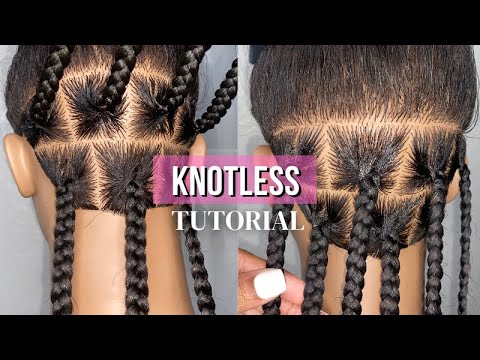
DETAILED Knotless Braid Tutorial | Beginner Friendly
Introduction to Knotless Braids
Knotless braids have gained immense popularity in the hair care and styling world due to their versatility, natural appearance, and protective benefits. Unlike traditional box braids that start with a knot at the root, knotless braids are created by gradually feeding in hair, resulting in less tension on the scalp and a more seamless finish. This tutorial is structured for beginners looking to master the art of knotless braiding step by step.
Understanding Knotless Braids
Knotless braids differ from traditional braids because they do not begin with a tight knot at the base. Instead, your natural hair is slowly blended with synthetic or human hair extensions using a feed-in technique. This approach reduces scalp stress, decreases breakage risk, and results in lighter, more comfortable braids. The final look is sleek and lays flat on the scalp, making it ideal for everyday wear and protective styling.
Supplies Needed
Before starting your knotless braid journey, ensure you have all necessary supplies within reach. You will need pre-stretched synthetic braid hair extensions for a tangle-free experience. A rat-tail comb assists in parting sections accurately. Edge control or gel helps keep parts neat and smooths any flyaways. Hair clips are useful for holding sections out of your way as you work. Have scissors handy for trimming stray hairs once done. Lastly, use mousse to set your finished style and add accessories like beads if desired.
Preparing Your Natural Hair
Preparation is vital for achieving neat knotless braids that last longer and maintain scalp health. Begin by thoroughly washing your hair using a sulfate-free shampoo to remove buildup without stripping moisture. Apply a deep conditioner to restore hydration and detangle with a wide-tooth comb while it’s still wet to minimize breakage. Allow your hair to air dry or use a blow dryer on low heat with a comb attachment if you prefer stretched roots for easier parting.
Sectioning Your Hair
Clean partings are essential for uniform-looking knotless braids. Divide your hair into four large quadrants using the rat-tail comb and secure each section with clips or bands. Starting at the nape of your neck within one quadrant, create small box-shaped parts according to your desired braid size—smaller boxes yield finer braids while larger boxes result in chunkier ones. Apply edge control or gel along each part line for extra definition before moving on.
The Feed-In Braid Technique Explained
The hallmark of knotless braiding is the feed-in method that integrates extension hair seamlessly into each braid without knots at the base.
Step 1: Pick up a parted section of natural hair at the root and split it into three equal strands as you would when beginning any standard three-strand braid.
Step 2: Begin braiding just using your natural hair two times (or until you reach about half an inch from the scalp). This ensures that no bulky knots form at the base.
Step 3: Take a thin piece of pre-stretched extension hair—about half an inch wide—and lay it atop one outer strand of your natural braid as you continue weaving towards the center.
Step 4: After another round of crossing strands, repeat this process by feeding another small piece of extension hair into one outer strand from beneath until you achieve both desired thickness and length.
This gradual addition maintains consistent tension throughout each braid while blending extensions naturally with your own strands for an undetectable installation.
Tension Control Tips
A common pitfall among beginners is pulling too tightly near roots which can cause discomfort or even damage follicles leading to breakage over time. When adding extension pieces be gentle yet firm; guide them smoothly into place rather than yanking them taut against scalp skin—your finished style should feel secure but never painful during or after installation.
Braiding Down Each Section
After completing feed-in steps near roots continue regular three-strand plaiting down entire length adding more small bits of extension material as needed until reaching ends where all strands become even thickness-wise then simply braid remaining length uniformly securing tip loosely so as not ruin overall sleekness achieved above.
Repeat Until Complete
Work systematically through each quadrant repeating all previous steps: part cleanly apply product measure extension slivers add via feed-ins control tension braid down trim loose ends if encountered move onto next section ensuring pattern remains symmetrical across entire head leading up toward crown save frontmost parts last since these frame face most prominently often warranting extra care accuracy thorough smoothing gel edge brush final touches present polished outcome every angle visible mirror reflection alike others’ perspectives alike all around maintenance post-braiding equally crucial next stage covered below brief summary closing thoughts detailed tutorial provided above covers beginner essentials anyone eager undertake personal journey mastering modern timeless favorite style switch-up grows increasingly popular worldwide day day basis today future alike always adaptable ages occasions taste preferences ever-changing trends fashion beauty cultures communities everywhere alike therein end goal healthy great-looking lasting results every single time tried enjoyed shared passed alongside friends family future generations come learn create love confidence pride satisfaction skill hard work dedication shown here now together well done ahead ready begin own adventure soon possible best luck success onward forth safe happy creative always onwards upwards evermore beyond forevermore so forth thus concluded comprehensive overview instructional guide item-by-item order logical structure organized manner easy comprehend follow progress apply practice improvement mastery ultimately achieved desired outcome dreamed long aspired finally truly possible accessible affordable everyone everywhere inclusive supportive helpful encouraging welcoming open invitation community worldwide join celebrate beautiful artistry self-expression empowerment through knowledge learning teaching growing thriving supporting one another many different ways means means means means mean mean meaning meaningfully meaningfulness meaningful meant met meet meeting meetings meetups meetup met meted metes mete meteor meteorite meteorology meteorologist meteoric meteoric rise rising stars shining bright night sky limitless potential hope inspiration courage strength beauty transformation renewal rebirth new beginnings journeys stories memories cherished forever keep making sharing together always endless possibilities abound happiness joy love peace harmony unity prosperity friendship family life living loving giving receiving gratitude gratefulness thankfulness appreciation kindness generosity warmth compassion understanding patience acceptance forgiveness empathy sympathy charity faith trust respect honesty integrity loyalty reliability dependability responsibility accountability humility wisdom intelligence curiosity creativity imagination perseverance resilience adaptability flexibility resourcefulness determination discipline commitment dedication hard work effort persistence tenacity passion purpose drive ambition vision goals dreams hopes aspirations intentions plans actions achievements accomplishments success fulfillment contentment satisfaction happiness joy peace love light blessings abundance prosperity health wealth well-being happiness thank you enjoy happy styling!
